Friday, February 27, 2015

Nail cabinet pt. 5

If I am going to make all 18 drawers, I had better make sure that they will all fit. I'm making them individually, so that each drawer will fit a specific slot, so I figured I should nail the dividers in place so that the cubbies have a defined size.


I predrilled all the holes, using this little hand drill I bought at an outdoor flea market in Brussels for my daughter. It's made in Germany and came with three small bits in a cavity in the handle.


Despite my preparations, one of the shelves still split. This is kind of discouraging, compounded by the fact that I found an offcut of 8mm plywood in the dumpster of the lumber yard the other day, almost perfectly sized for this purpose. I'm of half a mind to rip out these mdf dividers and fabricate new ones from the plywood. I've only made 1/3 of the drawers and could probably get them all to fit in new dividers. Hmm.


As per the instructions in the article, I've made a couple of layout aids to mark the location of the dividers on the case work, and the location of holes for the drawer pulls. Smart little jigs I'm glad I took the time to make up.

Tuesday, February 24, 2015

Zeitgeist pt. 1


My alumni magazine dropped through the mail slot today, and the cover shot sure looked familiar. Read the cover article here.

Nail cabinet pt. 4

With the dividers done (but not yet nailed into the cabinet), there are a few different ways to proceed with this project. I could nail the battens on to the sides, thus making the "crate" and a face frame on which to mount the hinge for the door. I have some material for this, but I may diverge from the project description and practice my mortise and tenons for this part of the project.

All the drawer parts were looking tempting, however, so I figured I would try my hand at making a practice drawer.


Using a dozuki and my miter box at the cluttered workbench.


Shooting the end of the drawer front. This material is 15x43 planed spruce from the lumberyard. By happenstance a perfect dimension for this project. I then cut a section of the 43mm wide plywood strips I had to the same length.


Lacking any nails for the time being I just glued up the drawer and held everything with clamps.


It was a tight fit, maybe too tight. But a few passes with the block plane and a coat of beeswax solved that problem.


Today I found some small nails to secure the drawer sides. I predrilled all the holes with a tiny 1mm bit in a tiny eggbeater drill. Still I had problems nailing into the back, as the nails kept going astray. Hopefully I'll get better as I make more drawers! The hardware looks good, doesn't it?

Monday, February 23, 2015

Authenticity and neo-primitivism

This article from a Canadian newspaper makes some interesting arguments, comparing some of the more precious attitudes of bourgeois liberal Westerners (of which the hand-tool movement is certainly a part) to the anti-vaccine movements and other technophobic tendencies in modern society. I certainly have my Luddite leanings, and believe we have much to learn from the past, but enjoy the comforts of a modern lifestyle as much as anyone. Hand-tool use in an apartment setting is as much about lack of space and dust and noise control as anything. I admire folks who insist upon complete authenticity in their approach to craft, but am not myself above the occasional technological shortcut (see my recent post fabricating drawer stock).

Paint it blue

2/3 of a can of blue paint left over from my Dutch tool chest project. At least some of it found its way onto some of my more recent projects...


Wednesday, February 18, 2015

Nail cabinet pt. 3

I was worried about making the interior dividers for this project. I don't have much experience working with hardboard, so I didn't know how it would take sawing and chiseling. And the cuts had to be precise of course, not just to look good but to work properly, so each drawer can be made identical and fit.


I cut the seven boards to length, and shot the ends with a block plane. No problems here! This worked like a charm, even though the block plane is overdue for a sharpening.


Being still somewhat young and limber, I took my material and all my layout tools to the living room floor to mark the dividers for cutting the eggcrate. Careful measuring ensures that each opening will be identical.


I gang cut the dividers, first drilling an 8mm hole straight through the end of each cut, and then sawing to the hole. This went smoothly.


I then dressed each slot at the workbench with a pair of chisels.


The finished dividers! The article did not saw whether to glue these parts or not. The fit is snug enough that I don't think I will. Anyway, the "shelf" elements will get screwed through the sides of the crate, and I reckon that that will be sufficient for holding everything in place.


The project so far...


Despite my careful measuring, there seems to be a slight discrepency from opening  to opening. I was worried about this. The drawer bottoms will all have to get trimmed, either at the shooting board or on the jigsaw table again. Since I'm off painting the nightstand in the basement bike storage room, I figured I would try painting the edges of these dividers too. The edges probably won't take paint that well, but we shall see. If it looks terrible, I'll just slip them into the case the other way around.

Tuesday, February 17, 2015

Nail cabinet pt. 2

This is a curious project. In a free pdf issue of Popular Woodworking Chris Schwarz describes a build of the iconic nail cabinet hanging in Roy Underhill's shop on his popular TV show The Woodwright's Shop. The cabinet is described as being found at a yard sale and made from a pre-built crate and shop scraps. The detailed drawings provided in the article have inspired many to build near exact replicas, at great cost. I choose rather to be inspired by the spirit of the original, and use a crate (from Systembolaget of course) and shop scraps, and to use the project as an exercise in repetitive work (18 drawers in mine!) and new skill development (the mitered panel doors featured in a previous entry).


Hardware from China didn't break the bank and arrived in a timely fashion.


The repetitive cuts required for this project were a good excuse to try out this contraption from Wolfcraft to mount a jigsaw upside down that I'd found a few months ago (at my favorite flea market of course, nearly complete and new, just missing a couple of nuts and bolts).


Shop scraps: some 8mm hardboard from who-knows-where and 4mm birch plywood off-cuts from a canoe project finished years ago.


The first cuts were pretty promising. My Bosch saw mounted right onto the attachment, and the sawbench served admirably (if a bit low) as a base.


I kept a handsaw handy to do quick crosscuts.


Stacks of drawer sides and bottoms. I'm going to have to give this gadget a thumbs-up for this type of use. Cutting each of these pieces by hand would have been a major hassle, and this set-up allowed me to have everything ready in an hour or two. It's the kind of product that's easy to laugh at, but as a substitute bandsaw for apartment dwelling you could do a lot worse.

Shaker nightstand pt. 7


Nearing completion on this project, the drawer guides get glued in place. The base is ready for some paint!

Monday, February 16, 2015

New bench thoughts

I need a  new and proper bench for my workspace. The top could be sturdier and needs new work holding fixtures, and it must be angled to allow me to work in and out of the doorway without hitting my elbow on the doorframe. I will probably keep the twin screw face vise I made from ACME rod and machine handles, but some new ideas for the worktop are inspiring.
Roy's episode "viceless devices" showed some interesting solutions, and now I have seen some good ideas at WK fine tools. My new bench will likely include some of these ideas.

Friday, February 13, 2015

Shaker nightstand pt. 6

The last major step in the nightstand project was the drawer. I'd saved a piece of the beech with some figure (and tricky grain to plane) for the drawer front, a couple pieces of a wine crate 10mm thick for the sides and back, and a sturdy sheet of birch ply from another wine crate.


First I had to cut the beech to size at the workbench. In the closet I need to use a short toolbox saw. I probably should have resawn it a bit thinner, but wanted to deal with that flat grain as little as possible. You can also see some of the holes for hardware in the original piece. These I'm just going to live with, likewise the woodburn text on the plywood.


A nice toothing plane a friend brought down from Norway together with a card scraper took care of the funny grain on the drawer front.


The little plow plane got called into action for the drawer bottom groove.


Not the world's finest dovetails, but my first half-blind attempt, and I'm pleased with the result.

A wooden "moving fillister"

My selection of both bench and joinery planes has some massive holes that need filling, so I was glad to find this wooden "moving fillister" plane at my favorite flea market for 15 kr. It was clearly missing a bunch of parts, but for the price I could improvise replacements, especially considering what a Veritas or a 78 with all the trappings costs. Mr. Schwarz recommends wooden models over the Stanleys, so this seemed like a steal. But it truly is an odd duck with an adjustable mouth and a chipbreaker. And that wedge without corresponding shaping on the plane body?


An old jigsaw blade will make a fine nicker, and I have brass sheet to make a depth stop and fence with.


More problematic will be the screw cap, since the wedge the plane came with doesn't even belong to this plane. And the adjustable mouth and chipbreaker (and plastic handles)? It turns out this is a "Howal Universalhobel" from East Germany, designed and sold as eight planes in one. Huh. I wonder what happened to its scrubplane blade.


Saturday, February 7, 2015

Shaker nightstand pt. 5

With the mortise and tenons finished and the top glued up it was time to cut the leg tapers and glue up the base of th table.


Back into the living room with the sawbench and my ripsaw.


Since I was already out of the workshop, I went ahead and smoothed the tapers with my no 4 and this improvised stop. I have considered installing one of those mortised aluminum planing stops in this bench, that may be a good idea.


The dry fit looks good.


Before I glue up the base I decided to plow some grooves in the sides to ease installation of the top. And to have an excuse to play with the plow plane.


All glued up!

Shaker nightstand pt. 4

To make the top of the table I had to select two sections of the beech I'd salvaged to edge join into a large panel. The grain structure of the different pieces would have to be taken into consideration, and I would have to cope with not having any long clamps or pinch dogs.


First I edge jointed with my wooden try plane. This plane doesn't have the world's flattest bottom, so I was a bit concerned about this procedure, but this concern proved unfounded, the edges lined up perfectly.


To glue up the panel I improvised this solution using scrap pieces and my twin screw bench vise. I could have rigged something with wedges, but this worked pretty well.


To cut the panel down to size I took it back out into the living room and used my saw bench. Once it was down to size I could take it back into the workshop closet and plane the top and bottom and shoot the edges.

Quick tool tote

While eating lunch, I was inspired to do something with this wine box I picked up from Systembolaget a while back. It's just glued and nailed plywood, but I thought it could be used to make a nice little tool tote.

I sketched the pattern at the table on a piece of paper with some round objects I had at hand, and gathered the tools I'd need.


I chose the 3/4" forstner bit since I had a 19mm dowel on hand. A close enough fit. I drilled the holes while the box was intact and still had all its integrity. I filpped the box and drilled the last bit of each hole from the opposite side. I was again working in the living room to keep my daughter company.


A small handsaw to cut off the sides...


...and a coping saw to cut the shaped ends.


With a rasp, files, and sandpaper to finish the edges.


The side pieces were cut down to make dividers, and they were glued in place.


My little flushcut saw picked up at Hida Tool came in handy.


A decent little tool tote, awaiting finish.

Nail cabinet pt. 1: Mitered panel door

An upcoming project requires a mitered panel door. Since miters are notoriously difficult to do right, I was a bit nervous about this step in the project. 


The stock came milled right from the lumberyard. OK, there are some machine marks, but the dimensions were exactly what I required. Of course the three meter long stock neede to be broken down in the living room before being brought into the shop.


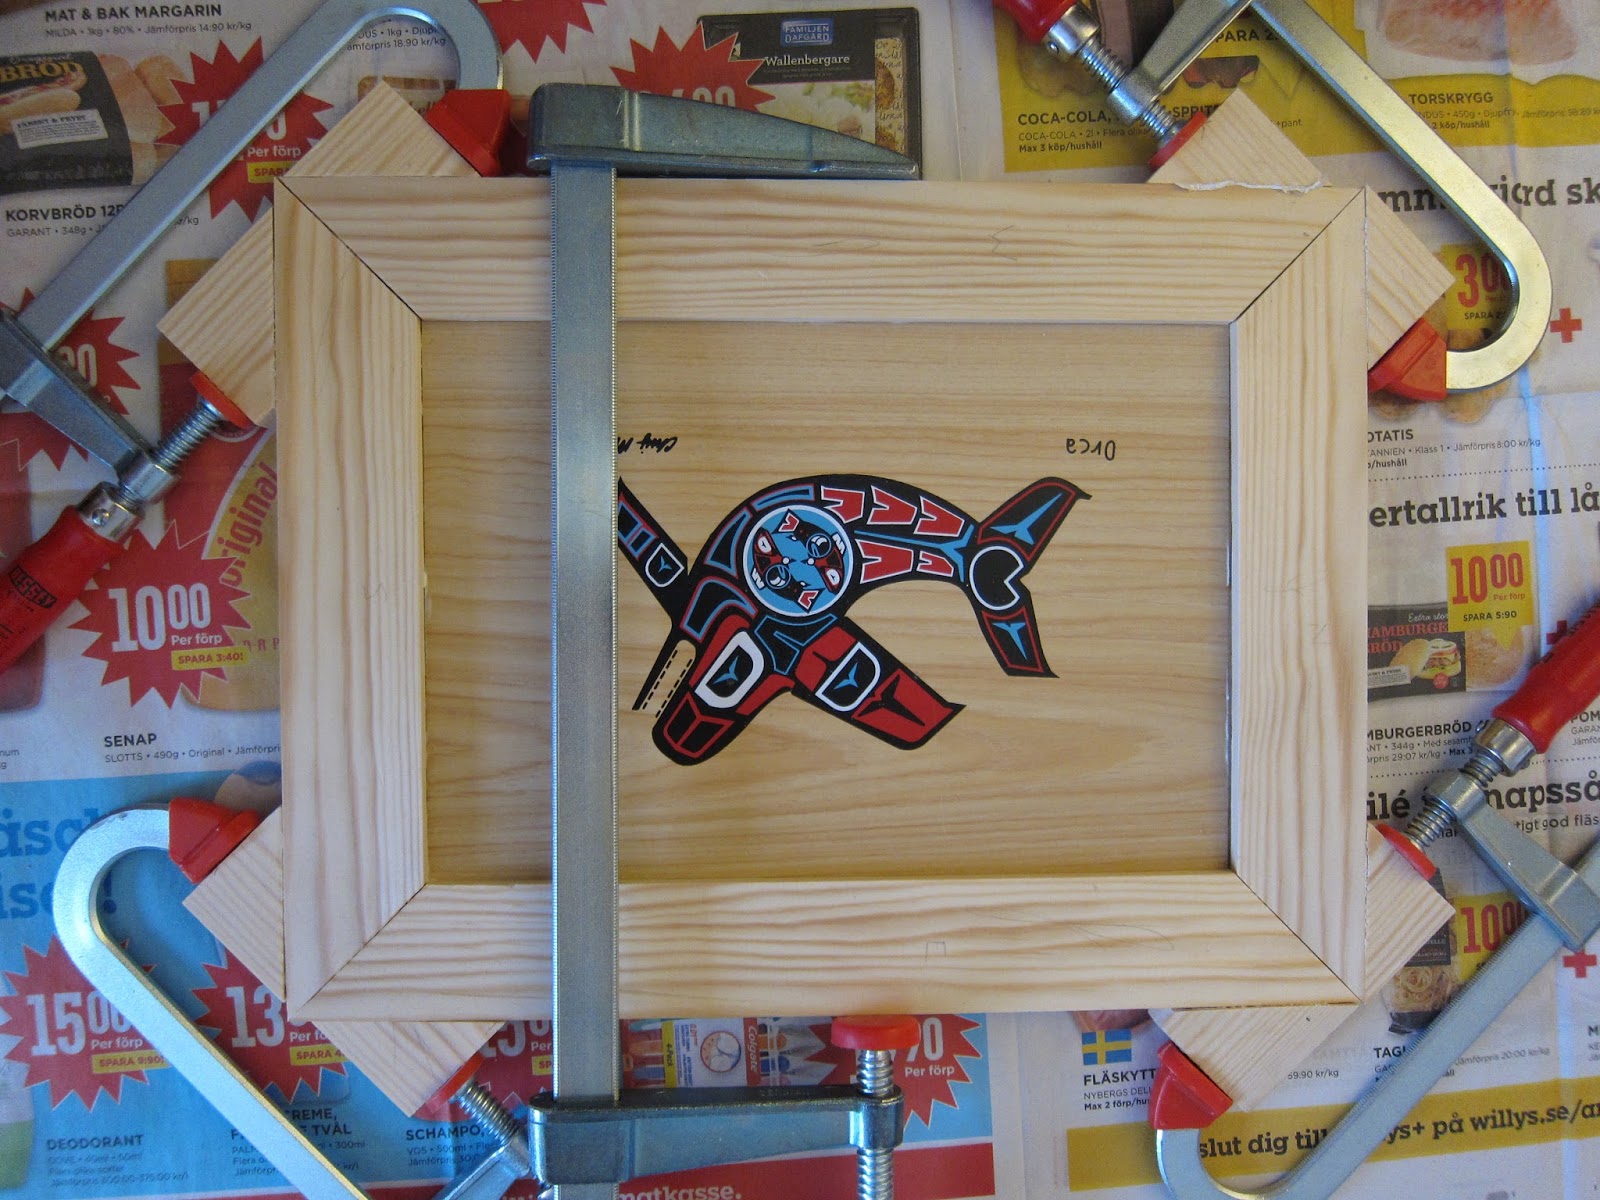
Here's the panel, a plywood sheet silkscreened with a Haida orca image that came from a box of smoked salmon. The sheet, together with the frame material is perfectly dimensioned for this project.


Since my daughter was home sick for the day, I moved the construction of this project into the living room to keep her company.


The miter box and miter shooting board got a workout today.


My longest clamps aren't long enough for this panel, so I thought I'd try using some very strong double-stick tape on the 45 degree off-cuts from the frame.


This worked out, but the blocks did have a tendancy to slide, so I didn't get as much clamping pressure as I would have liked.


After the glue was half dry, I applied more pressure just across the breadth of the panel with the clamps I have. This seemed to do the trick, mostly closing the miter gaps but at the cost of reducing the width/increasing the length slightly. The panel is not fully seated in the grooves in the top and bottom rails. I did glue the panel, as it is plywood, so we'll see how well it holds over the years. Since the signature was now positioned the wrong way, I removed it with some nail polish remover (sorry Chris Mahan) and will make up for the splotches with some beeswax/linseed oil and shellac.