Friday, June 17, 2016

The "Skansen" bench pt. 2

The weather has been pleasant recently, so rather than stay cooped up in the dark basement storage area I've been out riding my bike when I've had a moment to spare. But the rains came yesterday so I addressed the bench again.

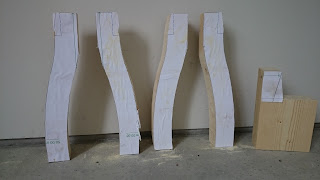
The legs needed to be cleaned and squared up after the jigsaw, and the compound curves provided a challenge I'd never dealt with before.


Fortunately I had this small wooden compass plane I'd bought at a flea market last fall. It cost nothing and was cute, but has been mostly just on display as a curiosity until now. Getting it tuned up took some work as the blade was rusted into place, but popping it in the freezer for a half hour or so helped free it up.  The radius isn't quite right, so the resulting surface is a little choppy. I hope to tune the plane up more to do a final smoothing before assembly.

The convex surfaces I addressed with the simple wooden smoothing plane. It's nice and sharp, and light, and leaves a very refined surface.


I then proceeded to mark and cut the tenons. I could arguably have used a more aggressive handsaw for this job, but chose the tenon saw and a 3/4" chisel. I cut the cheeks with the saw and pared to the line rather than risk chopping them out.


Work holding worked fine in the vise despite the funny shapes. I didn't notice any damage to the legs, but the surfaces need to be further refined anyway. First though: through mortises in the bench top!


Tuesday, May 17, 2016

The "Skansen" bench pt. 1

Skansen is a large outdoor living museum located right near the center of Stockholm, near the Vasa Ship Museum, Nordiska, and the amusement park Gröna Lund. It is a collection of buildings from all over Sweden meant to represent a cross-section of Swedish architectural and cultural traditions. It's a wonderful place to visit when in Stockholm to learn about Sweden's history: we take almost all our visitors there. We also have a year-pass so we can go whenever we want.

A couple of years ago I had dinner with Mr. Chris Schwarz after a Dutch Tool Chest course I took in England. Talking about Sweden he brought up a project he'd done called "The Skansen Bench" which I'd never heard of. To be honest, the name "Skansen Bench" doesn't say much, as there are probably hundreds of different benches on display there. Only later did I realize that this project is one reproduced by woodworkers everywhere after plans printed in Popular Woodworking. While I appreciate the idea, the dimensions of home center lumber don't really do the proportions of the original justice.


The bench would be better called "Älvros Bench" as it can be found at the Älvros Farmstead at Skansen, which is almost always open to the public. Even then the name isn't terribly descriptive since there are probably a half dozen benches at this site. The one on display is a copy, as the original has been archived in the Nordiska collection warehouses. Plans for reproducing the original were published in a popular Swedish woodworking book in the 1970s.


The bench is somewhat iconic, and can be seen as an inspiration for this bench made of dimensional lumber and to be found scattered about Skansen.


We needed a hallway bench as a place to sit and put on and take off shoes, as one doesn't typically tramp around a Swedish home in shoes. I found some planed lumber measuring 70x195 mm in 3.3 meter lengths at a lumberyard out in the archipelago, and bought one for just under 200 kr. Although the width is far less than the original, I designed my own version around the dimensions, with simplified legs and a narrower top. Upon arriving home with my stock, I had to buck it up in the garage before bringing it inside.


As my jigsaw didn't have blades for the capacity of the wood, I grabbed my crosscut panel saw out of the workspace.


The legs I'd drawn up in my Android CAD program (which isn't working now that my phone updated to Marshmallow) and exported them as pdfs to print out at full scale. These I glued on with spray contact cement.


I took the sawbench and jigsaw with new, extra long blades out to the public access balcony to saw my stock into legs.


It was slow going in the 70mm thick stock, and the blade had a tendancy to drift to the left, so I planned my cutting around that and after about and hour I had my four legs roughed out.


Wednesday, April 20, 2016

Monorail view camera pt. 2

OK, a couple of months without a post and of course the camera is completed now. To be honest there wasn't a whole lot of "woodworking" to be done after assembling the front and back frames, Instead, the project was all about fabricating parts in wood, metal, and fabric.


The lens boards were made after the frames were completed. I have one lens, with a sort of odd-ball 33mm diameter shutter. I cut the hole in the lens board to the right there just freehand with a knife, and sanded it smooth. These lens boards are just two pieces of 2mm birchplywood laminated to provide a lip. The walnut veneer was added for aesthetic reasons. All the gluing was done with some contact cement I bought in France to repair some shoes once.


Arguably the most challenging part of this build was making the bellows. There are plenty of resources online for assisting with this process, Google is your friend. The construction is a sandwich of a thin, coated nylon, card stock, and bookbinder cloth, and should be completely light-tight as well as fold flat. I sketched the bellows on my phone's CAD program, printed out at full scale, and made a model first to get the size right.


The assembled materials and tools for this day-long job. My daughter helped on a professional day when she was staying home from school. Here we've started gluing the card slats on the nylon.


The fourth side must be glued on a sort of ironing-board we fabricated from a parquet flooring offcut from a building site. After this step, the bookbinder's fabric was glued on, with the seam on the opposite side. Then the whole construction was turned inside-out and birch plywood frames were glued to the ends.


The front standards being fabricated from aluminum bar stock. I drilled a bunch of holes, and filed them flat.


Basically all the parts, just waiting for some screws.


The completed camera, on Easter.


One of the first shots, of my daughter and her friend. Old Arista ortho-lith film processed in Polymax.

Thursday, February 18, 2016

New project: Monorail view camera pt. 1

Being a fellow of many interests, I've always wanted a view camera to be able to play with movements and giant negatives. It may seem anachronistic in this age of phones with 20 megapixel optics, but view cameras offer the ability to correct perspective in-camera as well as other focus tricks, and the giant negatives (4x5 inches in my case) when scanned still offer far greater resolution than any digital camera.

View cameras can be bought complete relatively cheaply now, but of course I'd rather build one and challenge myself with a precision project. This won't be my first homemade camera: I've made dozens of pinhole cameras in the past, and most recently made this simple large format camera.

My basic plan started by finding a lens of appropriate specs (135mm f 5.6 in this case) and price (almost cheap as dirt) on ebay, downloading Jon Grepstads plans here, and sketching my ideas on my phone's CAD program. My first diversion from Grepstad's plans was to order a cheap double dovetailed camera Arca Swiss compatible rail and a pair of compatible clamps from Ebay. These things are ubiquitous out there nowadays, and very inexpensive, though they take weeks to ship. The rail is really designed for mounting cameras with giant lenses, or stereophotography rigs, but will serve me fine for this camera.

Secondly, I want to have a smaller front standard to make for a more compact total kit.

The rear standard will also be redesigned with a different focusing screen spring mechanism and non-rotating back.


Most of the parts of the camera. I had a little black walnut, and procured a little more (including veneer) for this project.


The first diversion from the plans: I'm using polycarbonate for my focusing screen. It needs a light texture on it, so I taped a piece of 1000 grit wet/dry paper on a sheet of glass, and using window cleaner for lubricant scuffed away. It worked admirably, though ultimately I may get another piece bead blasted for better uniformity.


After marking the film frame with a silver paint pen, I cut pieces of 5mm walnut as a frame for the ground glass.


These were just glued with contact cement on both sides of the glass, providing I rigid sandwich construction.


The larger black walnut pieces were dimensioned, and then I got to play with my newish moving fillister plane to make rabbets.


The frame was constructed with stopped sliding dovetails. I'm not too happy about the gappy joinery.


Nor am I happy with this eviden twist.


Glued up it's flat, but the joints are pretty ugly. I'm out of practice. And I really could have used a 1/8" chisel for this job.


The finished parts so far: focusing screen and rear standard, with the lens and monrail waiting for the rest of the components.


Monday, February 15, 2016

Chair modification pt. 5

So, the chair is finished and getting a lot of use in the loggia. It isn't perfect, but a fairly successful conversion anyway.


The tops of the legs were rounded with a chisel and block plane. Eveything got a light coat of raw linseed oil and beeswax, hopefully the birch will darken to match with age.


The upholstery job was easy, with foam from an IKEA cushion (IKEA gets a lot of hate, but 19 kr for a chair's worth of foam cushioning plus cotton for two shop rags is a great deal.) and some nice patterned blue fabric. The fabric was far and away the most expensive part of this project, but there's enough left for a throw pillow or two. The foam was contact cemented to the plywood, and the fabric drawn and stapled in place.

Saturday, February 13, 2016

Stockholm Furniture Fair

I swung by the Stockholm Furniture Fair yesterday to check out this year's trends. Saw a lot of these freestanding cabinets on legs, maybe because I've been thinking of making something similar.


Surprising amount of softwoods on display. This was from the student exhibition.


A geometric wall hung unit.


Another student project: a tabletop workbench. Been thinking of developing something similar to this.


 Yet another student project: tree tapping kit.


Schwarz-approved nails...


...as a giant flooring company logo.

Chair modification pt. 4

With the mortises cut and the legs mostly shaped it was time to glue the chair up again. This included regluing the back, which had some gaps.


I used hide glue for the first time with this project. It was a little thick, I think, which filled the joints and made them a little gappy. Live and learn.


With the frame glued up I could go ahead and cut off the tops of the legs, as the tenons now wouldn't bust out the endgrain. At least not yet!


Then I could shape the recesses to accept the seat.


I decided to reglue the whole thing, as the gappy joints just didn't look right. Succeeded better this time.


I salvaged this piece of 12mm plywood from a dumpster for the base of the seat, and used the pattern pictured in the previous photo to get the shape right.


With a quick coat of wax and the upholstery draped over the seat, this is what it looks like.

Monday, February 1, 2016

Chair modification pt. 3

To taper the legs, I marked the both tapers on both sides in pencil, and took them down to the workbench.


I notched the start of the cut with a chisel.


And just ripped down the line, holding the piece in the vise. The sawn face was then planed smooth on the bench. To shape the slight angle on the outside edges, I marked the depth of the cut with the cutting gauge, planed down along the corner to the mark, and then flattened the face. Neglected to shoot that process, though.

Thursday, January 28, 2016

Chair modification pt. 2

With the legs cut out and surfaces prepped, it was time to undertake the only real joinery of this project: cutting the mortises for the seat rails' tenons. These were nine millimeter wide, and would have to be located on the same location as the original chair's legs.


On site, I marked the height of the two tenons using a knife and a square.


I then marked the dimensions of the mortise from the original legs. I don't have a mortise gauge, so I just used my homemade cutting gauge, taking multiple passes after marking both legs.


With the mortises marked, I took the legs to my workshop and marked the cut more heavily with a knife.


I chiseled out a recess to guide my cutting, and then drilled pilot holes with an 8mm bit, hogging out as much waste as I could.


Clearly I don't have a 9mm mortise chisel, or any mortise chisel for that matter. I don't even have and 8mm or 9mm bench chisel, but the 1/4" chisel did admirably for the ends and the width, while the broad sides were pared down with a 3/4" chisel.


The front rail fits just fine!


I took the front subassembly upstairs to mate it to the rest of the chair. The side rails needed to be cleaned a bit of excess glue, and the mortises lightly shaped, but the final fit is nice and tight.


In situ. Next: shaping the legs, gluing it up, making a seat, finishing.